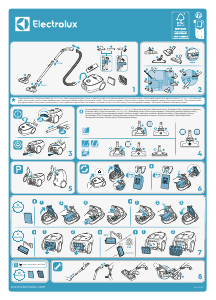
Vadovas Electrolux EUP82MG Dulkių siurblys
Reikia vadovo savo Electrolux EUP82MG Dulkių siurblys? Žemiau galite nemokamai peržiūrėti ir atsisiųsti PDF vadovą lietuvių kalba. Šiuo metu šis produktas turi 10 dažniausiai užduodamus klausimus, 0 komentarų ir 0 balsų. Jei tai ne tas vadovas, kurio norite, susisiekite su mumis.
Jūsų gaminys sugedęs, o vadove nėra jokio sprendimo? Eikite į Repair Café ir gaukite nemokamas remonto paslaugas.
Vadovas


Įvertinimas
Praneškite mums, ką manote apie Electrolux EUP82MG Dulkių siurblys, pateikdami produkto įvertinimą. Norite pasidalyti savo patirtimi apie šį produktą arba užduoti klausimą? Palikite komentarą puslapio apačioje.Daugiau apie šį vadovą
Suprantame, kad puiku turėti popierinį savo Electrolux EUP82MG Dulkių siurblys vadovą. Visada galite atsisiųsti vadovą iš mūsų svetainės ir atsispausdinti patys. Jei norite turėti originalų vadovą, rekomenduojame susisiekti su Electrolux. Jie gali pateikti originalų vadovą. Ar ieškote savo Electrolux EUP82MG Dulkių siurblys vadovo kita kalba? Pasirinkite pageidaujamą kalbą mūsų pagrindiniame puslapyje ir ieškokite modelio numerio, kad pamatytumėte, ar jį turime.
Specifikacijos
| Prekės ženklas | Electrolux |
| Modelis | EUP82MG |
| Kategorija | Dulkių siurbliai |
| Failo tipas | |
| Failo dydis | 2.72 MB |
Visi Electrolux Dulkių siurbliai vadovai
Daugiau Dulkių siurbliai vadovų
Dažnai užduodami klausimai apie Electrolux EUP82MG Dulkių siurblys
Mūsų palaikymo komanda ieško naudingos informacijos apie produktą ir atsakymų į dažniausiai užduodamus klausimus. Jei dažniausiai užduodamuose klausimuose pastebėjote netikslumų, praneškite mums naudodamiesi mūsų kontaktų forma.
Mano dulkių siurblio žarna užsikimšusi, ką daryti? Patvirtinta
Atjunkite žarną ir peržiūrėkite ją, kad nustatytumėte, ar ji tikrai užsikimšusi. Jei taip yra, galite paimti ilgą daiktą, pvz., šluotos kotą, ir atsargiai perstumti jį per žarną. Tai paprastai pašalins visus žarną užkimšančius objektus. Jei tai nepadėjo, kreipkitės į gamintoją.
Tai buvo naudinga (1464) Skaityti daugiauKokių dydžių yra dulkių maišeliai? Patvirtinta
Yra du dydžiai, į kuriuos reikia atsižvelgti. Pirmas yra lėkštės dydis su maišelio įėjimu. Tai lemia, ar dulkių maišelis tiks tam tikram dulkių siurbliui. Tada yra maišelio dydis. Tai dažniausiai nurodoma litrais ir nustato, kiek dulkių gali tilpti maišelis.
Tai buvo naudinga (944) Skaityti daugiauNoriu sužinoti savo Electrolux prietaiso amžių. Kaip tai padaryti? Patvirtinta
Savo gaminio amžių galite nustatyti naudodami serijos numerį. Tai galima rasti jūsų įrenginyje. Pirmasis serijos numerio simbolis nurodo metus (ty: 1 = 2001), o du simboliai po jų nurodo gamybos savaitę (ty: 35 = tų metų 35 savaitė). Taigi serijos numeris 13500016 rodo, kad mašina yra nuo 2001 m. 35 savaitės.
Tai buvo naudinga (836) Skaityti daugiauMano dulkių siurblio maitinimo laidas nesuvynioja atgal į įrenginį. Ką daryti? Patvirtinta
Gali būti, kad laidas yra susisukęs arba sulankstytas. Keletą kartų visiškai išvyniokite laidą ir, vadovaudamiesi rankomis, suvyniokite atgal į įrenginį. Jei tai neišsprendžia problemos, gali būti, kad sugedo laido atsukimo mechanizmas. Tokiu atveju kreipkitės į gamintoją arba remonto tarnybą.
Tai buvo naudinga (658) Skaityti daugiauMano dulkių siurblys skleidžia švilpimą, ką daryti? Patvirtinta
Šią problemą dažnai sukelia pilnas dulkių maišelis ar filtras arba kai yra anga, per kurią oras patenka į žarną. Patikrinkite dulkių maišelį ir filtrą ir, jei reikia, pakeiskite. Patikrinkite, ar žarnoje nėra skylių ar blogų jungčių. Jei tai neišsprendžia problemos, susisiekite su gamintoju.
Tai buvo naudinga (553) Skaityti daugiauKaip pašalinti dulkes ir plaukus nuo dulkių siurblio šepetėlio galvutės? Patvirtinta
Dulkės ir plaukai nuo dulkių siurblio šepetėlio galvutės pašalinami rankiniu būdu. Jei nepavyksta taip, kaip norima, galima naudoti smulkias šukas, kad pašalintumėte likusius nešvarumus.
Tai buvo naudinga (536) Skaityti daugiauKokį dulkių siurblio šepetėlio galvutės nustatymą turėčiau naudoti? Patvirtinta
Beveik visi dulkių siurbliai turi galvutę su reguliuojamu šepečiu. Naudokite šepetį kietiems paviršiams valyti, kad išvengtumėte įbrėžimų ir pažeidimų. Išjunkite kilimų ir kilimėlių šepetį.
Tai buvo naudinga (421) Skaityti daugiauAr galiu naudoti popierinį dulkių maišelį daugiau nei vieną kartą? Patvirtinta
Tai nepatartina. Maišelio poros bus prisotintos, dėl to nutrūks siurbimas ir gali būti sugadintas variklis.
Tai buvo naudinga (287) Skaityti daugiauKas yra HEPA? Patvirtinta
HEPA reiškia High-Efficiency Particulate Air. Daugelis dulkių siurblių turi HEPA filtrą. HEPA filtras sulaikys mažiausiai 85% ir daugiausia 99,999995% visų 0,3 mikrometro (µm) ir didesnių dalelių.
Tai buvo naudinga (260) Skaityti daugiauAr galiu naudoti įprastą dulkių siurblį pelenams susiurbti? Patvirtinta
Ne, tai visiškai neįmanoma. Pelenai, kurie atrodo atvėsę, viduje gali būti šilti arba net karšti. Įprastas dulkių siurblys tam nėra skirtas ir gali sukelti gaisrą. Be to, įprastų dulkių siurblių filtrai ne visada tinka itin mažoms dalelėms, tokioms kaip pelenai, sulaikyti. Tada jis gali pasiekti dulkių siurblio variklį ir sugadinti.
Tai buvo naudinga (251) Skaityti daugiau


Prisijunkite prie pokalbio apie šį produktą
Čia galite pasidalinti savo nuomone apie Electrolux EUP82MG Dulkių siurblys. Jei turite klausimų, pirmiausia atidžiai perskaitykite vadovą. Užklausą dėl vadovo galite pateikti naudodami mūsų kontaktinę formą.