Vadovas Whirlpool WH8IPB14AM6L0 Indaplovė

Reikia vadovo savo Whirlpool WH8IPB14AM6L0 Indaplovė? Žemiau galite nemokamai peržiūrėti ir atsisiųsti PDF vadovą lietuvių kalba. Šiuo metu šis produktas turi 12 dažniausiai užduodamus klausimus, 0 komentarų ir 0 balsų. Jei tai ne tas vadovas, kurio norite, susisiekite su mumis.

Jūsų gaminys sugedęs, o vadove nėra jokio sprendimo? Eikite į Repair Café ir gaukite nemokamas remonto paslaugas.

Vadovas

Loading…
ENDaily Reference Guide
1
THANK YOU FOR BUYING A WHIRLPOOL PRODUCT.
In order to receive a more complete assistance, please
register your appliance on: www.whirlpool.eu/register
FIRST TIME USE
W11553946 panel
W11572189 button R
W11572083 button L
W11569647 display
1 2 3 4 5 6 7 8 9 10
11 12 13
14
15
Before using the appliance carefully read Safety
and Installation Instructions. More information about your product
available on website: docs.whirlpool.eu/docs
After installation, please remember to remove all transport protection
parts from the dishwasher.
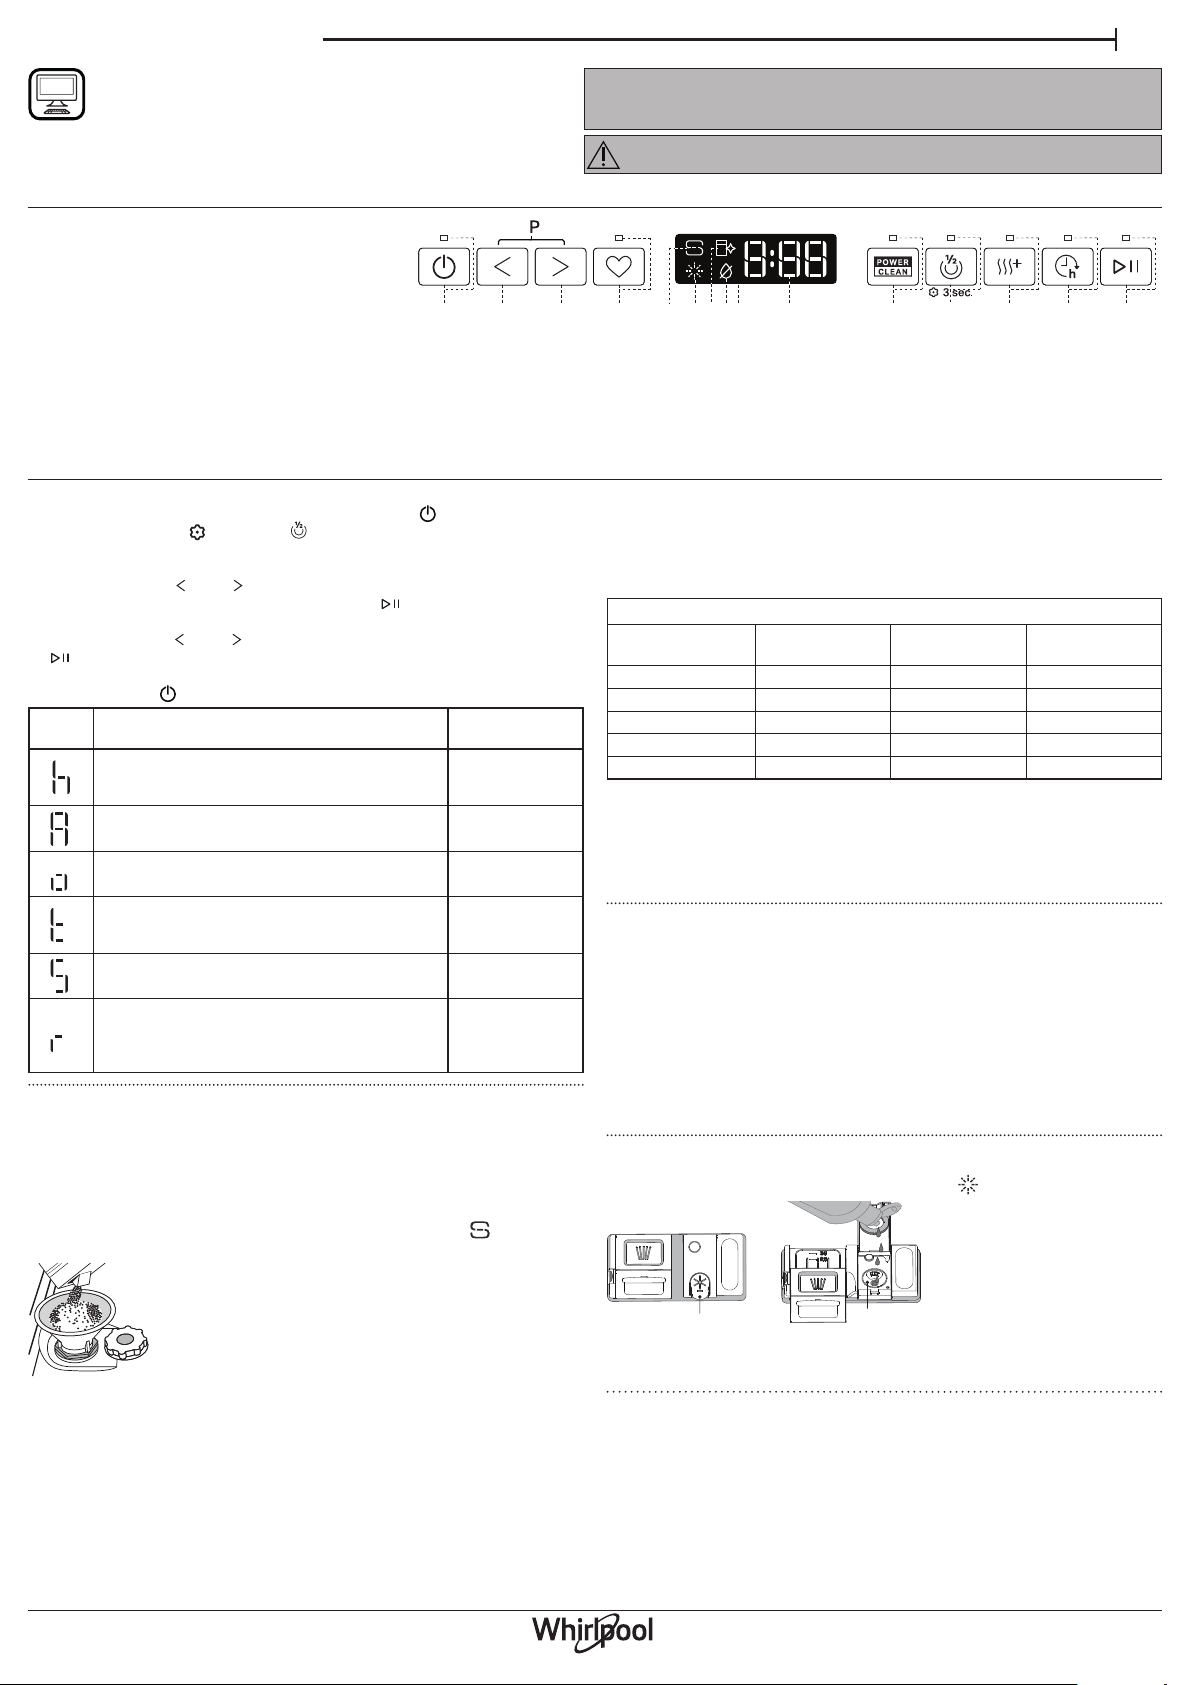
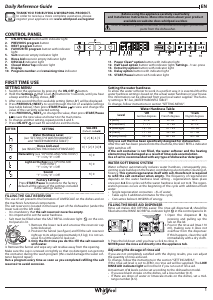
SETTING MENU
1. Switch on the appliance by pressing the ON-OFF button.
2. Hold the Settings (Half Load ) button for 3 seconds, until you hear
a beep and the display shows SEt”.
3. After one second the rst available setting (letter h”) will be displayed.
4. Press PREVIOUS /NEXT to scroll through the list of available settings
(see table below), then press START/Pause to view and change the
value of the currently selected setting.
5. Press PREVIOUS /NEXT to change the value, then press START/Pause
to save the new value and return to the main menu.
6. To change another setting, repeat points 4 and 5.
7. Press ON-OFF or wait 30 seconds to exit the menu.
LETTER
SETTING
VALUES
(Default - in bold)
Water Hardness Level
(see “SETTING THE WATER HARDNESS”
and “WATER HARDNESS TABLE”)
1 | 2 | 3 | 4 | 5
Rinse Aid Level
(see “ADJUSTING THE DOSAGE OF RINSE AID”)
0 | 1 | 2 | 3 | 4 | 5
NaturalDry (see “OPTIONS AND FUNCTIONS”)
“1” = On, “0” = O
1 | 0
Light on the oor (see “OPTIONS AND
FUNCTIONS”)
“1” = On, “0” = O
1 | 0
Sound
“1” = On, “0” = O
1 | 0
Factory Settings
Press START/Pause to restore to the factory
default all the values of the settings included
in the settings menu.
-
FILLING THE SALT RESERVOIR
The use of salt prevents the formation of LIMESCALE on the dishes and on
the machine’s functional components.
The salt reservoir is located in the lower part of the dishwasher (under the
lower rack on the left side).
It is mandatory that the salt reservoir never be empty.
It is important to set the water hardness.
Salt must be lled when the SALT REFILL indicator light on the con-
trol panel is lit.
1. Remove the lower rack and unscrew the reservoir cap
(anticlockwise).
2. Position the funnel (see gure) and ll the salt reservoir
right up to its edge (approximately 0,5 kg); it is not un-
usual for a little water to leak out.
3. Only the rst time you do this: ll the salt reservoir
with water.
4. Remove the funnel and wipe any salt residue away from the opening.
Make sure the cap is screwed on tightly so that no detergent can get into
the container during the wash program (this could damage the water sof-
tener beyond repair).
Run a program every time as soon as you completed relling the salt
reservoir to avoid corrosion.
Setting the water hardness
To allow the water softener to work in a perfect way, it is essential that the
water hardness setting is based on the actual water hardness in your house.
This information can be obtained from your local water supplier. The facto-
ry setting is 3”. See „WATER HARDNESS TABLE”.
To change, follow instructions in section “SETTING MENU”.
Water Hardness Table
Level
°dH
German degrees
°fH
French degrees
°Clark
English degrees
1 (soft) 0 - 6 0 - 10 0 - 7
2 (medium) 7 - 11 11 - 20 8 - 14
3 (average) 12 - 16 21 - 29 15 - 20
4 (hard) 17 - 34 30 - 60 21 - 42
5 (very hard) 35 - 50 61 - 90 43 - 62
Only use salt that has been specically designed for dishwashers.
After the salt has been poured into the machine, the SALT REFILL indicator
light switches o.
If the salt container is not lled, the water softener and the heating
element may be damaged as a result of limescale accumulation.
Use of salt is recommended with any type of dishwasher detergent.
WATER SOFTENING SYSTEM
Water softener automatically reduces water hardness, consequently pre-
venting scale buildup on the heater, contributing also to better cleaning ef-
ciency. This system regenerates itself with salt, therefore it is required
to rell the salt container when empty. The frequency of regeneration
depends on the water hardness level setting - regeneration takes place
once per 4-6 Eco cycles with the water hardness level set to 3. The regen-
eration process occurs at the beginning of the cycle with additional fresh
water.
Single regeneration consumes: ~3L of water;
Takes up to 5 additional minutes for the cycle;
Consumes below 0.005kWh of energy.
FILLING THE RINSE AID DISPENSER
Rinse aid makes dish DRYING easier. The rinse aid dispenser A should be
lled when the RINSE AID REFILL indicator light in the control panel is lit.
1. Open the dispenser B by
pressing and pulling up the
tab on the lid.
2. Pour in the rinse aid (max.110
ml), making sure it does not
overow from the dispenser.
If this happens, clean the spill
immediately with a dry cloth.
3. Press the lid down until you hear a click to close it.
NEVER pour the rinse aid directly into the appliance tub.
Adjusting the dosage of rinse aid
If you are not completely satised with the drying results, you can adjust
the quantity of rinse aid used.
To change, follow the instructions in the section “SETTING MENU”.
If the rinse aid level is set to ZERO, no rinse aid will be supplied. The LOW
RINSE AID indicator light will not be lit if you run out of rinse aid.
A maximum of 6 levels can be set according to the dishwasher model.
If you see bluish streaks on the dishes, set a low number (0-3).
If there are drops of water or limescale marks on the dishes, set a mid-
range number (4-5).
A
B
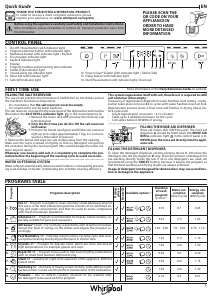
CONTROL PANEL
1. ON-OFF/Reset button with indicator light
2. PREVIOUS program button
3. NEXT program button
4. FAVOURITE program button with indicator
light
5. Salt reservoir empty indicator light
6. Rinse Aid reservoir empty indicator light
7. DESCALE indicator light
8. Closed Water Tap indicator light
9. Display
10. Program number and remaining time indicator
11. Power Clean® option button with indicator light
12. Half Load option button with indicator light/ Settings - 3 sec. press
13. Extra Dry option button with indicator light
14. Delay option button with indicator light
15. START/Pause button with indicator light
Atsisiųsti vadovą lietuvių kalba (PDF, 150.97 MB)
(Tausokite gamtą ir spausdinkite šį vadovą tik tada, kai tai tikrai būtina)

Loading…

Įvertinimas

Praneškite mums, ką manote apie Whirlpool WH8IPB14AM6L0 Indaplovė, pateikdami produkto įvertinimą. Norite pasidalyti savo patirtimi apie šį produktą arba užduoti klausimą? Palikite komentarą puslapio apačioje.
Ar esate patenkinti Whirlpool WH8IPB14AM6L0 Indaplovė?
Taip Ne
Būkite pirmieji įvertinę šį produktą
0 balsai

Prisijunkite prie pokalbio apie šį produktą

Čia galite pasidalinti savo nuomone apie Whirlpool WH8IPB14AM6L0 Indaplovė. Jei turite klausimų, pirmiausia atidžiai perskaitykite vadovą. Užklausą dėl vadovo galite pateikti naudodami mūsų kontaktinę formą.

Daugiau apie šį vadovą

Suprantame, kad puiku turėti popierinį savo Whirlpool WH8IPB14AM6L0 Indaplovė vadovą. Visada galite atsisiųsti vadovą iš mūsų svetainės ir atsispausdinti patys. Jei norite turėti originalų vadovą, rekomenduojame susisiekti su Whirlpool. Jie gali pateikti originalų vadovą. Ar ieškote savo Whirlpool WH8IPB14AM6L0 Indaplovė vadovo kita kalba? Pasirinkite pageidaujamą kalbą mūsų pagrindiniame puslapyje ir ieškokite modelio numerio, kad pamatytumėte, ar jį turime.

Specifikacijos

Prekės ženklas Whirlpool
Modelis WH8IPB14AM6L0
Kategorija Indaplovės
Failo tipas PDF
Failo dydis 150.97 MB

Visi Whirlpool Indaplovės vadovai
Daugiau Indaplovės vadovų

Dažnai užduodami klausimai apie Whirlpool WH8IPB14AM6L0 Indaplovė

Mūsų palaikymo komanda ieško naudingos informacijos apie produktą ir atsakymų į dažniausiai užduodamus klausimus. Jei dažniausiai užduodamuose klausimuose pastebėjote netikslumų, praneškite mums naudodamiesi mūsų kontaktų forma.

Kai mano indaplovė baigia savo ciklą, talpyklė, kurioje yra tabletė, neatsidarė. Kaip tai įmanoma? Patvirtinta

Šią problemą dažnai sukelia indai, kurie blokuoja konteinerį. Patikrinkite tai prieš įjungdami indaplovę.

Tai buvo naudinga (8390) Skaityti daugiau

Indaplovė nebešildo vandens, kodėl taip yra? Patvirtinta

Tikėtina, kad šildymo elementas yra sugedęs. Pakeiskite. Jei kyla abejonių, susisiekite su gamintoju.

Tai buvo naudinga (8182) Skaityti daugiau

Ar galiu indaplovėje naudoti įprastą druską? Patvirtinta

Ne, įprastoje druskoje gali būti medžiagų, kurios gali sugadinti jūsų prietaisą.

Tai buvo naudinga (3486) Skaityti daugiau

Ar man reikia išskalauti indus prieš dedant juos į indaplovę? Patvirtinta

Indų skalauti nebūtina, tačiau reikia pašalinti didelius, kietus ir riebius likučius. Laikui bėgant jie gali užkimšti kanalizaciją.

Tai buvo naudinga (1439) Skaityti daugiau

Ar galiu atidaryti indaplovę, kai ji veikia? Patvirtinta

Daugumoje indaplovių yra vandens sustabdymas, todėl programa iškart sustabdoma atidarius dureles, o tai reiškia, kad vanduo neišeis. Su kai kuriais modeliais tai gali sukelti problemų laikui bėgant. Naudojant įmontuotas indaploves gali būti, kad dažnai atidarius indaplovę veikiant, dėl išsiskiriančių garų gali būti pažeistos aplink esančios spintelės.

Tai buvo naudinga (1226) Skaityti daugiau

Ar turėčiau atidaryti indaplovę jai pasibaigus, kad indai greičiau išdžiūtų? Patvirtinta

Tai priklauso nuo indaplovės tipo ir indaplovės vietos. Kai kuriose indaplovėse yra funkcija, kuri po plovimo programos išdžiovina indus. Tokiu atveju indaplovės atidarymas neturės jokios pridėtinės vertės. Naudojant įmontuotas indaploves gali būti, kad dažnai atidarius indaplovę veikiant, dėl išsiskiriančių garų gali būti pažeistos aplink esančios spintelės.

Tai buvo naudinga (978) Skaityti daugiau

Ką reiškia „6-asis pojūtis“? Patvirtinta

Whirlpool prietaisai, kuriuose įdiegta 6th Sense technologija, turi jutiklius, kurie užtikrina optimalų mašinos darbą. Pavyzdžiui, džiovyklose šie jutikliai matuoja skalbimo metu likusią drėgmę ir sustabdo mašiną, kai viskas visiškai išdžius.

Tai buvo naudinga (910) Skaityti daugiau

Kai indaplovė baigia savo ciklą, plastikiniai indai vis dar šlapi, o likusieji ne. Kodėl taip? Patvirtinta

Plastikas yra blogas šilumos laidininkas, todėl gaminiai greitai atvėsta. Tada ant jo likusi drėgmė išgaruoja daug mažiau nei, pavyzdžiui, ant keramikos ar metalo.

Tai buvo naudinga (873) Skaityti daugiau

Ar galiu prijungti indaplovę prie ilgintuvo? Patvirtinta

Prietaisų, kuriems reikia daug energijos, pavyzdžiui, indaplovės, negalima prijungti prie visų ilgintuvų. Pažiūrėkite, koks yra indaplovės energijos suvartojimas, kuris nurodytas vatais, ir patikrinkite, ar prailginimo laidas su tuo susitvarko. Yra ilginimo laidų su storesniais laidais, kurie skirti didesniems prietaisams.

Tai buvo naudinga (819) Skaityti daugiau

Ar galiu į indaplovę dėti medinius daiktus, pvz., menteles ir pjaustymo lenteles? Patvirtinta

Ne. Mediniai daiktai gali būti pažeisti arba deformuoti indaplovėje. Be to, atsilaisvinęs medienos pluoštas gali sugadinti indaplovę. Medinės pjaustymo lentos dažnai gaminamos su klijais, kurie gali atsilaisvinti kelis kartus pabuvus indaplovėje.

Tai buvo naudinga (816) Skaityti daugiau

Ar galiu į indaplovę dėti keptuves su teflonu? Patvirtinta

Taip tu gali. Tačiau keptuvė susidėvės greičiau nei valant rankomis. Valydami keptuvę su teflonu rankomis, niekada nenaudokite šveitiklio, o naudokite minkštą kempinę ar audinį.

Tai buvo naudinga (815) Skaityti daugiau

Ar problema, kad indaplovės viduje yra metalo įbrėžimų? Patvirtinta

Daugumos indaplovių vidus yra pagamintas iš nerūdijančio plieno ir nėra pažeistas įbrėžimų.

Tai buvo naudinga (812) Skaityti daugiau
Vadovas Whirlpool WH8IPB14AM6L0 Indaplovė

Susiję produktai

Susijusios kategorijos

×
Download