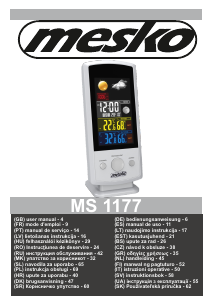
Vadovas Mesko MS 1177 Meteorologijos stotis

Reikia vadovo savo Mesko MS 1177 Meteorologijos stotis? Žemiau galite nemokamai peržiūrėti ir atsisiųsti PDF vadovą lietuvių kalba. Šiuo metu šis produktas turi 5 dažniausiai užduodamus klausimus, 5 komentarų ir turi 2 balsų, kurių vidutinis produkto įvertinimas yra 50/100. Jei tai ne tas vadovas, kurio norite, susisiekite su mumis.

Jūsų gaminys sugedęs, o vadove nėra jokio sprendimo? Eikite į Repair Café ir gaukite nemokamas remonto paslaugas.

Vadovas

Loading…

5
Into the probe insert 2x AAA battery.
batteries inside.
Description of the device. ( Weather Station)
1. Control panel: Buttons Back: 1.a. MODE, 1b.UP, 1.c. DOWN, 1.d. ALARM, Buttons Front: 1e. CHANNEL, 1f. SNOOZE/LIGHT1.g. ALERTS
Display:
2. Clock 3.Inside temperature 4. Date 5. Outside temperature 6. Probe 7. Moon Phase (0-8 phases) 8. Weather Forecast 9. Indoor humidity % 10. Outdoor
humidity % 11. High/ Low alerts indicator 12. Air Pressure 13. Time alarms 1,2
2. Operation Instruction
Insert the battery (2xAA) into the device or connect adapter after a few seconds, LCD will light up, after a beep, it enters default mode.
After setting, press "MODE"(1a) to confirm/exit.
2.1 Time Setting
Under default state, press and hold "MODE"(1a) for 4 seconds to enter setting in sequence, the time will start to flash.
Setting item blinking at 1s frequency.
Press “UP”(1b) key, the data goes up one step; press and hold for 2 seconds or more, it will go ahead at 8 steps per second speed.
Press the “DOWN”(1c) key, the value goes down one step; press and hold for 2 seconds, go back at 8 steps per second speed.
The order of the setup goes as follows:
After 10 seconds of not pressing any button, the device will exit the change mode and will save all current settings that were changed to that point.
Hour→ Minute→ Year→ Month→ Day→ Week Language→ Exit
2.2 Alarm Setting
To set the alarm press the “MODE”(1a) button once. The text AL 1 will appear next to the date and the last alarm setting will appear.
Press and hold “MODE”(1a) Button for 2 seconds and the first digit of the setting will start to Flash.
After setting, press "MODE"(1a) to confirm and exit.
Setting item blinking at 1s frequency.
Press “UP”(1b) key, the value goes ahead one step; press and hold for 2 seconds, go ahead at an 8 step per second speed.
Press “DOWN”(1c) once and back; press and hold for 2 seconds, go back at an 8 step per second speed.
After 10 seconds of not pressing any button, the device will exit the change mode and will save all current settings that were changed to that point.
AL2 Setting is the same as the AL1 setting.
Setting in sequence: AL1 Hour→AL1 Minute →Exit
2.3 Alarm ON/OFF
* Under default mode, press "ALARM"(1d) to turn on/off the alarm in sequence:
AL1 ON→AL2 ON→AL1 and AL2 ON→AL1 and AL2 OFF
When the alarm turns on you can press. Alerts button to shut it off. You can also press the “Snooze”(1f) button. It will turn off again after the *Snooze* time
runs out up to 20 minutes.
To change the “Snooze” time duration press and hold the “Snooze/Light”(1f) button for 4 seconds and using the “UP”(1b) and “DOWN”(1c) keys change the
time up to 20 minutes.
After 2 minutes of working the alarm will shut down of its own accord.
During the alarm, the corresponding AL1 or AL2 icon will flash.
When in snooze mode, corresponding AL character will flash.
To change the backlight strength press “SNOOZE/LIGHT”(1f) once. The device has 3 settings. 1. Maximum backlight 2. Minimum backlight 3. No backlight
If the alarm time for both AL1 and AL2 is the same. Only AL1 will flash when the time has been reached.
When one alarm is on snooze and the other alarm turns on the device will still turn on and alarm us.
You can turn on the snooze function without limit.
* Snooze could be repeated all the time.
The alarm has 3 settings.
a.0-10 seconds after the alarm starts, the device will make a noise 1 time per second
b.10-20 seconds after the alarm starts, the device will make a noise 2 time per second
c. Over 20 seconds after the alarm starts, the device will make a noise 4 time per second
2.5 Temperature and Humidity Function
* Out of the indoor and outdoor temperature display, the low-end displays “Lo”, the high-end displays “Hi”. You can check the lowest and highest recorded
temperatures by pressing the „Alerts”(1g) briefly to cycle between them. The device picks up problems that work on up to 3 radio channels.
* Under normal mode, press “CHANEL”(1e) key to switch outdoor temperature and humidity display, switch in sequence: CH1 temperature and humidity→
CH2 temperature and humidity→CH3 temperature and humidity→ CH2 temperature and humidity→ CH1 temperature and humidity (cycle display).
To change the channel of the Probe open the Probe and in the middle, there is a switch with 1,2,3 next to it. By sliding the switch up and down change the
number of the channel the probe is using
2.6 Temperature Alert Setting
* Under time mode, press the “ALERTS(1g)” key to check temperature alert for both highest and lowest indoor and outdoor temperature.
* Under temperature alert mode, press “UP”(1b) key or “DOWN”(1c) key to turn alarm on/off. Once turned ON, next to the corresponding alarm symbol will
appear.
* Under time(default) mode, press and hold “ALERTS”(1g) key for 4 seconds to check temperature alert both highest and lowest outdoor and indoor
temperature in sequence: highest outdoor temperature→ lowest outdoor temperature→ highest indoor temperature→ lowest indoor temperature→
exit
* Indoor temperature upper limit: 50C, lowest limit: 0C.
* Outdoor temperature upper limit: 70C, lowest limit: -40C.
* Setting item blinking at 1s frequency.
* Press “UP”(1b), value go ahead one step; press and hold for 4 seconds, go ahead at an 8 step per second speed.
* Press “DOWN”(1c) key, the value goes back one step; press and hold for 4 seconds, go back at an 8 step per second speed.
* After setting, press "ALERTS"(1g) to confirm.
* After 10 seconds of not pressing any button the device will exit the change mode and will save all current settings that were changed till that point.
TECHNICAL DATA
Station:100-240V 50/60Hz + 2xAA
Probe:2xAAA
4
Atsisiųsti vadovą lietuvių kalba (PDF, 3.9 MB)
(Tausokite gamtą ir spausdinkite šį vadovą tik tada, kai tai tikrai būtina)

Loading…

Įvertinimas

Praneškite mums, ką manote apie Mesko MS 1177 Meteorologijos stotis, pateikdami produkto įvertinimą. Norite pasidalyti savo patirtimi apie šį produktą arba užduoti klausimą? Palikite komentarą puslapio apačioje.
Ar esate patenkinti Mesko MS 1177 Meteorologijos stotis?
Taip Ne
50%
50%
2 balsai

Prisijunkite prie pokalbio apie šį produktą

Čia galite pasidalinti savo nuomone apie Mesko MS 1177 Meteorologijos stotis. Jei turite klausimų, pirmiausia atidžiai perskaitykite vadovą. Užklausą dėl vadovo galite pateikti naudodami mūsų kontaktinę formą.

Simona 08-12-2021
Prašau, jei galite man parašyti, kaip nustatyti oro slėgį meteorologinei stočiai mesko MS 1177?

atsakyti | Tai buvo naudinga (24) (Išvertė Google)
Marta 28-07-2022
Stotis neskaito išorinio jutiklio parametrų. Pakeičiau baterijas, bet tai nieko nepakeitė. Ką daryti? Ekrane rodoma OFF išoriniams ir vidiniams jutikliams, tačiau matomi vidiniai parametrai.

atsakyti | Tai buvo naudinga (23) (Išvertė Google)
Marie Johansson 21-10-2021
Kodėl paviršiaus temperatūra rodoma neteisingai? Rodo 40 laipsnių per karštą

atsakyti | Tai buvo naudinga (11) (Išvertė Google)
M P 02-08-2022
Prijungus prie baterijų, ekranas nuolat pereina į saugaus režimo ciklą. Jei prijungtas laidas, tai neįvyks. Ar galima pakeisti nustatymus, kad net kraunant baterijas ekranas nepereitų į saugųjį režimą?

atsakyti | Tai buvo naudinga (1) (Išvertė Google)
Waldemar 28-02-2023
Kam skirtas orų stoties jutiklio jungiklis „1,2,3“?

atsakyti | Tai buvo naudinga (1) (Išvertė Google)

Daugiau apie šį vadovą

Suprantame, kad puiku turėti popierinį savo Mesko MS 1177 Meteorologijos stotis vadovą. Visada galite atsisiųsti vadovą iš mūsų svetainės ir atsispausdinti patys. Jei norite turėti originalų vadovą, rekomenduojame susisiekti su Mesko. Jie gali pateikti originalų vadovą. Ar ieškote savo Mesko MS 1177 Meteorologijos stotis vadovo kita kalba? Pasirinkite pageidaujamą kalbą mūsų pagrindiniame puslapyje ir ieškokite modelio numerio, kad pamatytumėte, ar jį turime.

Specifikacijos

Prekės ženklas Mesko
Modelis MS 1177
Kategorija Meteorologijos stotys
Failo tipas PDF
Failo dydis 3.9 MB

Visi Mesko Meteorologijos stotys vadovai
Daugiau Meteorologijos stotys vadovų

Dažnai užduodami klausimai apie Mesko MS 1177 Meteorologijos stotis

Mūsų palaikymo komanda ieško naudingos informacijos apie produktą ir atsakymų į dažniausiai užduodamus klausimus. Jei dažniausiai užduodamuose klausimuose pastebėjote netikslumų, praneškite mums naudodamiesi mūsų kontaktų forma.

Mano meteorologinė stotis numatė, kad lietus, bet taip neatsitiko. Kodėl taip? Patvirtinta

Meteorologinės stoties prognozė pagrįsta oro slėgiu. Apskritai žemas slėgis reiškia blogą orą, o aukštas – gerą orą. Gali būti, kad oro sąlygos vystysis kitaip, nei prognozuoja oro slėgis.

Tai buvo naudinga (1469) Skaityti daugiau

Kurioje vietoje geriausia oro stotis ir jos jutikliai? Patvirtinta

Pati orų stotis yra viduje ir turi būti atokiau nuo šilumos šaltinių, tokių kaip virtuvė, langai ar elektros prietaisai. Atskiras lauko temperatūros jutiklis turi būti pastatytas šešėlyje ir bent 1,25 m virš žemės. Lietaus jutiklį reikia pastatyti atviroje vietoje, kur jis visada galėtų surinkti lietų. Vėjo jutiklį taip pat reikia pastatyti atviroje vietoje, kur yra kliūčių, turinčių įtakos vėjui.

Tai buvo naudinga (395) Skaityti daugiau

Mano meteorologinėje stotyje yra lietaus matuoklis, ar jis taip pat gali išmatuoti iškritusį sniegą? Patvirtinta

Kai kuriuose lietaus matuokliuose yra kaitinimo elementas, kuris tirpdo sniegą ir leidžia jį išmatuoti. Be kaitinimo elemento lietaus matuoklis užsikimš ir nebus galima atlikti matavimų.

Tai buvo naudinga (282) Skaityti daugiau

Ar galiu ilgą laiką palikti keičiamą bateriją įrenginyje? Patvirtinta

Keičiamos baterijos gali likti įrenginyje ilgą laiką, jei prietaisas yra naudojamas. Kai prietaisas laikomas ilgą laiką, patartina išimti baterijas, kad išvengtumėte oksidacijos.

Tai buvo naudinga (282) Skaityti daugiau

Mano įrenginio baterija oksiduota, ar vis tiek galiu saugiai ją naudoti? Patvirtinta

Taip, įrenginį vis tiek galima saugiai naudoti. Pirmiausia išimkite oksiduotą akumuliatorių. Niekada tai nenaudokite plikomis rankomis. Tada nuvalykite akumuliatoriaus skyrių vatos tamponu, suvilgytu acte arba citrinos sultimis. Leiskite jam išdžiūti ir įdėkite naujas baterijas.

Tai buvo naudinga (281) Skaityti daugiau
Vadovas Mesko MS 1177 Meteorologijos stotis

Susiję produktai

Susijusios kategorijos

×
Download