Smoke Alarm RM C 9010
IMPORTANT:
Read and conserve these operating instructions. Observe and
follow the safety instructions.
Introduction
These operating instructions must be read through carefully in
their entirety. It forms part of your newly purchased battery-
powered, photoelectric smoke detector and contains important
information relating to its operation and handling.
This is described simply as the 'smoke alarm' from now on. All
safety advice must be observed when using this product. If
there are any questions arising regarding the use of the smoke
alarm please contact your specialist dealer or our service point.
The operating instructions must be conserved and passed on
to third parties if necessary. Care must be taken to ensure that
the smoke alarm is in perfect condition.
Warning:
In order to prevent injuries, this device must be reliably secured
to the ceiling in accordance with the assembly instructions. Bat-
teries may not be exposed to excessive heat such as sunlight,
fire or the like.
Technical data
Device: RM C 9010
Tested according to: DIN EN 14604:2005/AC:2008
Area of application: according to DIN 14676
Audible alarm: approx. 85 dB (3 m distance)
Power supply: 9 V DC zinc-carbon battery
Operating life: at least 1 year
Choosing the installation site
Smoke alarm installation sites are regulated on a mandatory
basis in application standard DIN EN 14676 which is valid in
Germany.
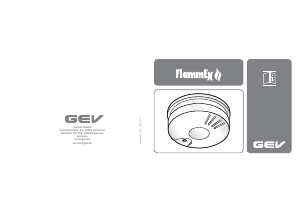
1. To provide comprehensive protection smoke detectors
should be installed in all rooms, corridors, storage areas and
basements. In rooms greater than 60 m² or corridors longer
than 10 m, the use of more than one smoke alarm is recom-
mended.
2. You should at least provide minimum protection and install
a smoke detector in every bedroom and children's room, as
well as in corridors used as emergency routes.
3. For optimal protection there should be at least one smoke
detector installed in every room and corridor.
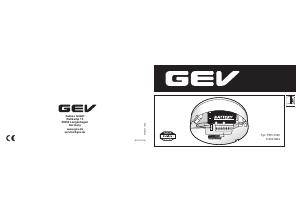
4. In corridors and hallways with a max. width of 3 m, the dis-
tance between two smoke alarms may be max. 15 m. the dis-
tance of the alarm from the front of the corridor or hallway
must not exceed 7.5 m. One alarm each must be installed at
intersections, T-junctions and in corner areas (miter line) in
hallways and corridors. An example of the arrangement is il-
lustrated in the following figure:
4. If the length and width of a gallery exceeds more than 2 m
and the total surface area of the gallery is more than 16 m
2
,
an additional alarm must be installed under the gallery. See
the follow image:
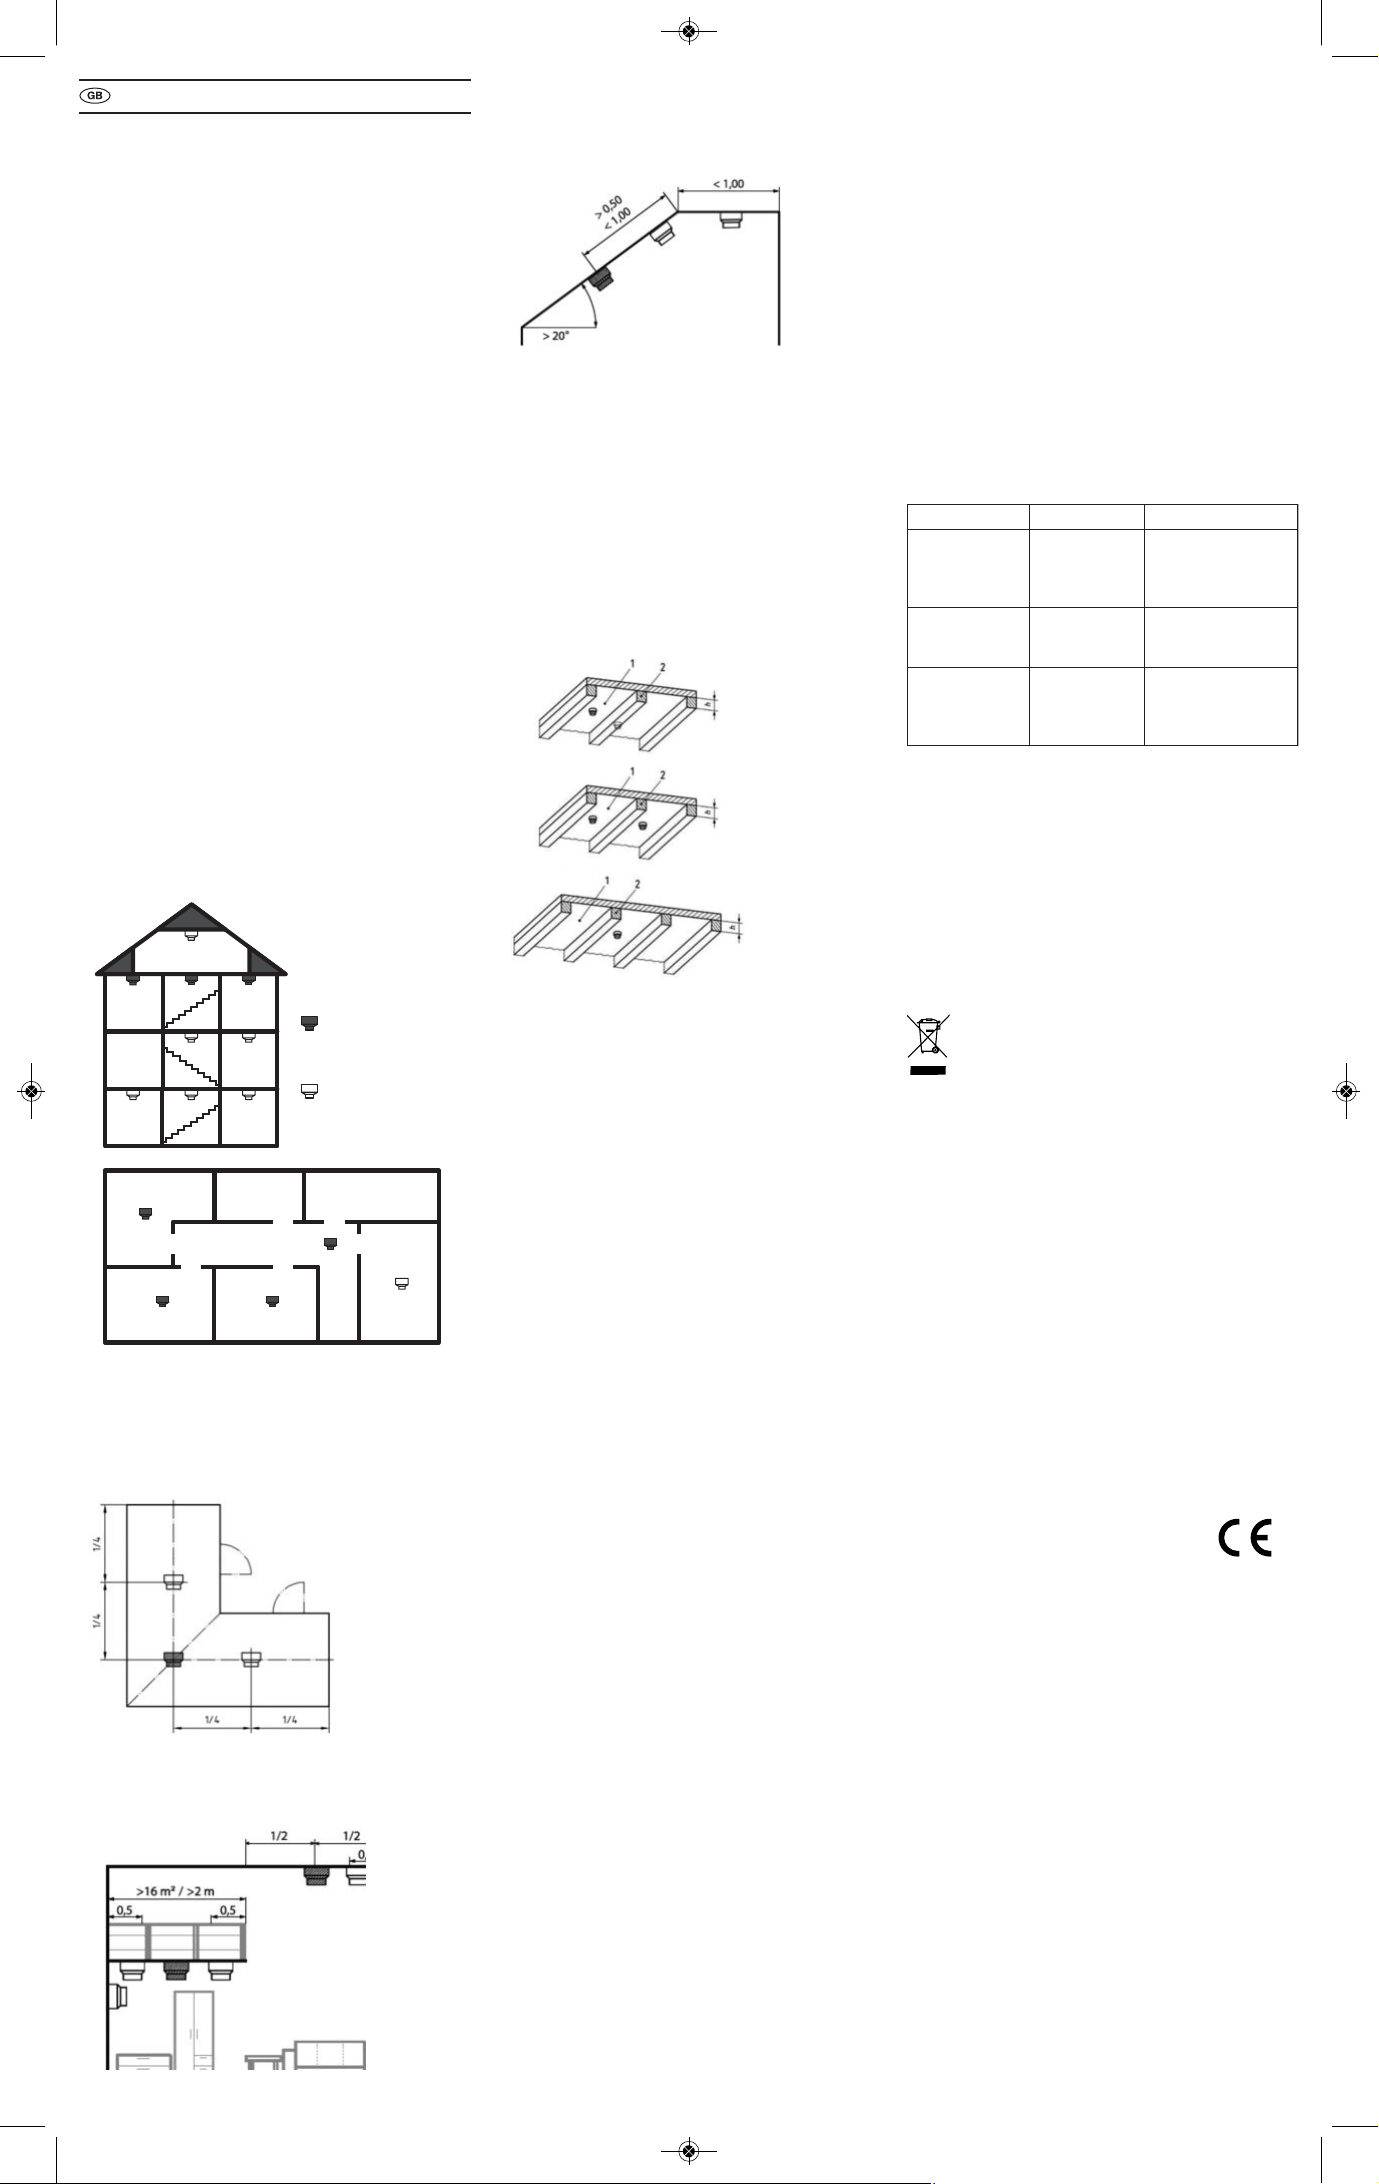
6. In rooms with partially slanted ceilings, the following ap-
plies: if the horizontal ceiling is less than 1 m wide, install
the alarm as illustrated in the following picture. If the hor-
izontal ceiling is wider than 1 m, then install the alarm in
the centre of the horizontal ceiling. See the follow image:
7. If the height of the room is more than 6m, please use an
additional smoke alarm.
8. Since smoke rises upwards, smoke alarms must always be
installed on the ceiling, and if possible in the middle of the
room in a level position. According to DIN EN 14676, a dis-
tance of at least 0.5 m must be maintained from all fitments
on the ceiling and walls.
9. Do not install under the ridge of a roof (place at least 30 -
50 cm below the ridge), near air ducts, or in areas with a
strong draught.
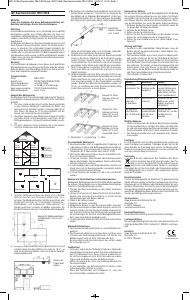
10. If ceiling beams with a height of more than 20cm and the
individual ceiling sections between the beams have a sur-
face area of more than 36m², additional smoke alarms must
be installed on the sections of the ceiling. If the height of
the ceiling beams is less than 20cm, install a smoke alarm
in the centre of the ceiling and not on a beam.
Example of
subsections with a
height of ≤0.2 m
Example of
subsections with a
height of >0.2 m and
a ceiling section
>36 m²
Example of subsec-
tions with a height of
>0.2 m and a ceiling
section
<_36 m²
1 = ceiling section
2 = subsection
h = height Installation locations
Installation sites to be avoided
1. Do not install smoke alarms in drafty areas, e.g. near air
conditioning and ventilation openings.
2. In bathrooms, shower rooms or rooms in which the temper-
ature exceeds 45° C or drops below 5° C.
3. Not in the peak of a ceiling in which smoke-free air might
accumulate in the event of a fire.
4. In kitchens, garages, laundry rooms or boiler rooms, cooking
vapors, vehicle exhaust, dust and moisture can trigger a false
alarm.
5. In very dusty or dirty areas. Dirt and dust can accumulate
and negatively impact the functional safety.
6. At a distance of less than 1.50 m from fluorescent lamps.
Installation and commissioning of the smoke alarm.
The included mounting material is suitable for concrete ceilings.
For other subsurfaces, appropriate mounting material must be
purchased from a specialist dealer.
1. Mark the position of the smoke alarm on the ceiling and drill
2. Drill holes with a depth of 25-30 mm using a 5.5 mm bit
(concrete ceiling) or a depth of approx. 20 mm using a
2.5 mm bit (wood paneling or beams).
3. Insert dowels into the holes.
4. Screw the holder onto the ceiling.
5. Insert the battery included in the delivery into the smoke
alarm.
6. Place the smoke detector onto the holder and turn clockwise
until it snaps in place. The system is fitted with a safety
feature, which prevents the system from being attached to
the installation plate if a battery has not been inserted.
7. During normal operation, the LED flashes once every
32 seconds.
User information
1. The smoke alarm only works if the battery is installed.
2. The smoke alarm can only trigger an alarm if it detects smoke
or burning item in the air. The alarm does not react to heat,
flames or gas.
In the event of an alarm, a loud signal is produced, which
stops as soon as the air is clear again.
Function test
• Test the unit by pressing the test button for at least 4 seconds
until an alarm sounds. The alarm will sound three times; then
there will be a 1.5 second pause. This interval repeats until
the button is released. If no signal or another signal sounds,
the unit is defective or the battery is spent.
• During the test, stay an arm’s length from the smoke alarm.
• Testing the unit weekly is recommended in order to ensure
it functioning properly.
• If the functional test is not successful, the smoke alarm must
be replaced.
Minimum
configuration
Optimal
configuration
Lofts
Bedroom
Children's room Children's room Living room
BathroomBedroom
Corridor
Kitchen
Children's
room
Living
room
Work
space
Corridor
Corridor
Corridor
Kitchen
Basement
Replacing the battery
The 9 V DC battery provided for the smoke alarm should last at
least one year if used normally. The smoke alarm has a low-
battery indicator. An audible signal sounds at a 32-second in-
terval. Replace the battery when you hear this signal.
1. Remove the smoke alarm from the base by turning it
counter-clockwise.
2. Remove the battery.
3. Install the new battery.
4. Place the smoke alarm on the base and turn it clockwise until
it clicks into place.
5. Perform a function test. (See "Function test" chapter)
Maintenance and care
• In addition to the regular tests, the battery has to be replaced
every year. (See chapter “Replacing the battery”)
• The smoke alarm must be cleaned at least once a month. Re-
move the battery before cleaning. Remove the dust using a
soft cloth. If necessary, remove dirt using a moist rag. Do
not use any solvents and make sure no water can get into
the unit. Install the battery after cleaning and perform a func-
tional test (see "Function test" chapter).
Meanings of signals/fault description
Important notices
• Do not under any circumstances open the casing of the
smoke alarm in order to clean the inner parts. This can cause
damage or reduce the operating life of the smoke alarm.
• Smoke alarms should be replaced every 10 years.
• The smoke alarm must not be covered or painted over.
Evacuation plan
We recommend establishing an evacuation plan together with
the other residents. Be careful to ensure that there will not under
any circumstances be any obstacles to the evacuation route in
the event of a fire. It must also be the quickest and safest route
into the open air.
Disposal
At the end of the product’s service life, it may not be dis-
posed of with the normal house trash. The product must
be disposed of at a depot for electrical and electronic
equipment processing. Ask your city or municipal
administration regarding options for environmental and proper
disposal of the product.
Manufacturer's warranty
Marked devices have a 3-year manufacturer warranty from the
purchase date. Please keep the purchase receipt as verification.
The warranty only applies to material or manufacturing defects
if the unit is properly used. The warranty is void in the event of
unauthorized intervention. Your statutory rights are not limited
by this warranty. Provided rechargeable batteries, batteries and
illuminants are not covered by the manufacturer warranty.
Service address
Hugo Brennenstuhl GmbH & Co. KG
Seestraße 1-3
D-72074 Tübingen
www.brennenstuhl.com
Declaration of conformity
The conformity declaration is stored by the manufacturer.
Declaration of performance
You can download the declaration of performance at
www.brennenstuhl.com directly under article RM C 9010 /
article no. 1 29008 0.
Manufacturer
Hugo Brennenstuhl GmbH & Co. KG
Seestraße 1-3
D-72074 Tübingen
Display Meaning Solution
Continuous, pul-
sating tone.
Alarm or test
function has
been triggered.
Immediately leave the
hazard zone or release
the test button (func-
tional test).
Audible signal
produced every
32 seconds.
The battery is
low.
Replace the battery.
See chapter “Repla-
cing the battery”.
The signal
sounds three
times every
1.5 seconds
The smoke
alarm is perfor-
ming a functio-
nality test
Release the test but-
ton, in order to end
the function test.
16
1772-CPR-160105
DOP-BRT-0010
EN 14604:2005/AC:2008
Example of alarm arrangement
in corner areas, corridors and
hallways
Rooms with
podiums or
galleries
Horizontal
ceilings less
than 1 m wide
022116 Rauchwarnmelder RM C 9010.qxp_022116 BA_Rauchwarnmelder RM C 9010 19.02.21 14:44 Seite 2


Prisijunkite prie pokalbio apie šį produktą
Čia galite pasidalinti savo nuomone apie Brennenstuhl RM C 9010 Dūmų detektorius. Jei turite klausimų, pirmiausia atidžiai perskaitykite vadovą. Užklausą dėl vadovo galite pateikti naudodami mūsų kontaktinę formą.