
14 15
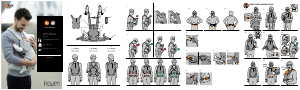
Back carry with parallel (H) straps, > 9 months
1. Close the leg support zippers and the head support zipper. (39)
2. The back carry position works with the air cushion, so fill the air cushion in this position with air.
3. Open the cap of the air valve. Inflate the air cushion by blowing air into the valve with your mouth. Keep
the back of the air valve clear from the backside to avoid obstruction of the air flow. Close the cap. (40)
4. Connect the shoulder strap narrowing buttons to create extra room for your baby’s head. (41)
5. Connect the shoulder strap buckles to the main body, without crossing them. Do not tighten the
shoulder straps yet. (42)
6. Place the waist belt around your waist. Connect the waist belt buckle in front. It is locked when you
hear a click. Rotate the waist belt until the waist belt buckle is in the back. (43)
7. Place your baby facing you. (43)
8. Fit the main body of the baby carrier over the back of your baby. (44)
9. Place the shoulder straps over your shoulders and close the chest strap buckle on your back. (45)
10. Slide your right hand under the right shoulder strap and push your arm out at the top. (46, 47)
11. Put your left elbow under the left shoulder strap and slide your arm out. (48, 49)
12. Carefully rotate your child around your body, always holding the child with one arm. (50, 51, 52)
13. Slide the shoulder straps over your shoulder at each side, make sure that the shoulder straps are not
twisted. (53, 54)
14. Move the chest strap up or down it sits comfortably on your chest. Tighten the chest strap. (55, 56)
15. Tighten the shoulder straps. (57)
• Tip! Practise the following steps with a doll or teddy bear until you feel confident.
• Tip! Practise the following steps with a doll or teddy bear until you feel confident.
Front carry outward-facing with crossed (X) straps, > 5 months
1. Open both leg support zippers and the head support zipper. (27, 28)
2. Fold the head support down and close the two head support snaps. (29)
3. The front carry outward-facing position works with the air cushion, so fill the air cushion in this
position with air.
4. Open the cap of the air valve. Inflate the air cushion by blowing air into the valve with your mouth. Keep
the back of the air valve clear from the backside to avoid obstruction of the air flow. Close the cap. (30,
31)
5. Connect the shoulder strap narrowing buttons to create extra room for your baby’s head. (32)
6. Place the waist belt around your waist. Connect the waist belt buckle in front. It is locked when you
hear a click. Rotate the waist belt until the waist belt buckle is in the back.
7. Place your baby facing away from you. (33)
8. Fit the main body of the baby carrier over the belly of your baby. (34)
9. Take the right shoulder strap, cross it behind your back and connect it with the left shoulder belt
buckle. (35)
10. Do the opposite for the left shoulder strap. (36)
11. Both buckles are locked when you hear a click.
12. Tighten the shoulder straps. (37)
13. Check and correct baby’s posture with a pelvic tuck: place your hands inside the babycarrier low on
your baby’s back. Move your hands down and away from you and rotate baby’s bottom so that baby’s
crotch is angled away from you and the knees are raised. The spine of the baby should have a natural
‘C’ curve. (38)
• To take the baby out follow the steps in reverse order. Always keep a hand on your baby.
• To take the baby out follow the steps in reverse order. Always keep a hand on your baby.
! Warning
• Your balance may be adversely aected by your movement and that of your child.
• Take care when bending or leaning forward or sideways.
• This carrier is not suitable for use during sporting activities.
• Constantly monitor your child and ensure the mouth and nose are unobstructed when using
the carrier.
• For low birthweight babies and children with medical conditions, seek advice from a health
professional before using the product.
• Check that the child does not fall out when it becomes more active
• Be aware of hazards in the domestic environment e.g. heat sources, spilling of hot drinks.
• Stop using the carrier if parts are missing or damaged.
• Check that the child does not become too hot, while using this baby carrier.
• Check that the child does not become too cold, while using this baby carrier.
• Read all instructions before assembling and using the baby carrier.
• Keep the instructions for future use.
• Check to assure all buckles, snaps, straps, and adjustments are secure before each use.
• Check for ripped seams, torn straps or fabric and damaged fasteners before each use.
• Ensure proper placement of the child in the product including leg placement.
• Premature infants, infants with respiratory problems, and infants under 4 months are at
greatest risk of suocation.
• Never use a baby carrier when balance or mobility is impaired because of exercise,
drowsiness, or medical conditions.
• Never use a baby carrier while engaging in activities such as cooking and cleaning which
involve a heat source or exposure to chemicals.
• Never wear a baby carrier while driving or being a passenger on a motor vehicle.
• Keep this carrier away from children when it’s not in use.
• Gentle wash
• Do not bleach
• Do not tumble dry
• Do not iron
• Do not dry clean
• Dry flat
• Wash with similar colours.
• Before washing close all zippers and open all buckles (58, 59).
• Before washing remove the air cushion (60-67).
• BeSafe recommends using a laundry bag.
Care instructions
How to remove the air cushion
How to insert the air cushion
1. Open the zipper on the inside of the waist belt. (60)
2. Open the cap of the air valve. (61)
3. Take the air cushion out of the waist belt. (61)
4. Push the air valve through the opening in the fabric. (62)
5. Remove the air cushion completely. (63)
1. Insert the air cushion in its pocket in the waist belt. (64)
2. Push the air valve through the opening in the fabric. (65)
3. Close the cap of the air valve. (66)
4. Close the zipper. (67)


Prisijunkite prie pokalbio apie šį produktą
Čia galite pasidalinti savo nuomone apie BeSafe Haven Kūdikio nešioklė. Jei turite klausimų, pirmiausia atidžiai perskaitykite vadovą. Užklausą dėl vadovo galite pateikti naudodami mūsų kontaktinę formą.